

Anamorphic Workflows in Post – Part 1
Ive used anamorphic adapters for a little while now, but never shot anything I was planning to do a lot of post work on. Now I need to work out a simple workflow to deal with data travelling between packages while maintaining quality and things like proper pixel aspect ratios. I wanted to consolidate some things here so they would all be in one place and I could share them with you, or be told there is a better way of doing certain things. Im going to start in 2d mainly Nuke to work with the plates and generate a camera for 3D to work with and then move data over into Maya and back again. I may add other pieces to this like After effects, Vray, Houdini, 3Ds Max etc.
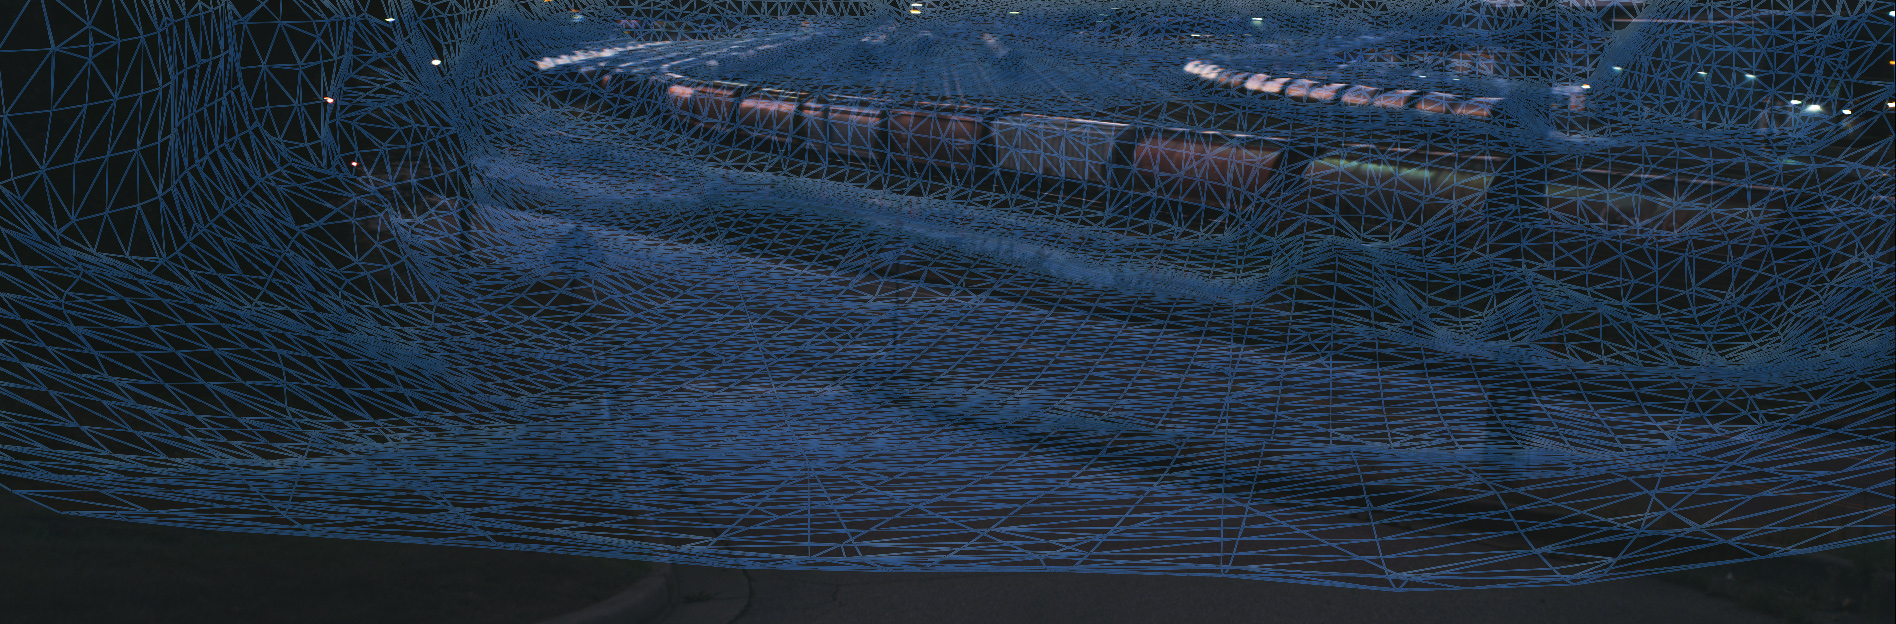
Ok to start below there are 2 photos of a plate shot on the Red Epic in 5k ana with the Lomo 50mm 2X Round front anamorphic lens. So the plate when you receive it should look like the one on the left that is squished horizontally and looks normal once is has been desqueezed.


Nuke
Format
- Import your footage into nuke as the original squeezed source then Set the project to match the resolution of your footage and the pixel aspect ratio should match the stretch of your lens. Do not automatically use the 2k or 4k cinemascope formats because the aspect ratio may not match up with what you actually shot. Then once you move into 3d you will find some settings no longer match up and you might have to redo everything or accept that its not going to be perfect. I was able to get most of the info I needed off the support page on Red.com and downloading the manual for the Epic camera.
Lens Distortion
- If you are going to be tracking anything in these plates you really should shoot a lens grid. If you just try to analyse the lines you may get odd results, it seems like you have to reformat the grid so it is no longer squeezed. Also I had to shrink the plate down a bit but from 5Kana down to around 2K but this may be because Im doing some of this on a laptop. So once the plate is desqueezed you can setup the lens distortion. First add in the parameters that you know so the computer doesnt guess and get these values wrong. So I have an anamorphic lens and a stretch factor of 2, and after you do the grid analysis the rest of the values will fill out.
Camera Tracker
- After using the lens grid to calculate the lens distortion, copy these values into the camera tracker and select undistort input.
*This way was a lot more accurate then using the lens distortion node to remove it and selecting no distortion in the camera tracker.
Camera solver and Output
- Now in the solver tab I used the unknown constant because not all lenses are bang on 50mm or 85mm etc and then put in the filmback size from the camera. I shot on the Red Epic and had to check the support page because the red cameras window the sensor at different resolutions essentially changing the filmback size. SO shooting at 5k anamorphic is actually 17.8mm X 14.58mm. After you input this info go back to the first tab an track the footage and output a scene with a camera. I tracked this footage a few times and it always gave me slightly below 50mm for my lens. The first time I had used the wrong resolution but it came out to 24mmX2 = 48mm. This sim was a little less then that at 19.69mmX2 = 39.38mm but the track was solid so Im sticking with them.
Overscan setup
- After the lens distortion is removed your plate should extend out over the render area. To fix this you can either ignore it and request 3d to overscan by a certain percentage or render out the plate at a slightly larger resolution like an overscan inside nuke. Either way anything coming back into nuke should be rendered slightly larger because when you apply your distortion back on it is going to suck the edges back in towards the center. So to do this in 2D apply a reformat node after the lens distortion set to scale and a resize type of none. Scale the resolution up until the edge of your plate are back inside the render area. If you need to do this in 3d there is already an overscan option in the scanline render node.


After you create your scene and camera you can start aligning the ground plane, creating a dense point cloud and backing out mesh objects if you need them and then write out the geo and cameras to Alembic for 3d.
After Effects and Video Copilot
Import and Interpret Footage
- In the property bin interpret the footage to have the proper pixel aspect.
Composition Settings
- In the composition setting you can change the aspect ratio to match your footage and then toggle the pixel aspect correction in the viewer to preview everything properly.
Video Copilot Flares
- If you are using an anamorphic lens you may think its silly to create fake ones in Video Copilot Flares but what if you had to place CG ontop and rebuild them or move a light source. Well if you do just make sure you do yur set up in Afterefects or in Nuke first and then inside the options for Video copilot you will also need to change the aspect ratio. Be aware that it doesnt match to other packages I used to so a 2X lens in Video copilot will have a ratio of 0.50.


Maya
Import Alembic and Camera settings
- Im not sure why this is not in the usual import dialogue but you have to go to the Pipeline Cache menu and import your Alembic files from there. Next go to the camera that you brought in from Nuke, the settings dont seem to translate perfectly over but this is probably due to us working in anamorphic. So change your focal length from 35mm or whatever to the camera focal length from nuke X2. In my example you will see the value from nuke was 19.69 making the value needed in Maya 39.38mm. The Camera Aperture is the same as the film gate you put in Nuke but needs to be converted to inches. So 17.80 X1 4.58 becomes 0.701 X 0.574. Lastly dont forget to add your lens squeeze ratio.
Render Settings
- In the render setting match the resolution to that of the source material and add the pixel aspect ratio. The device aspect will auto fill and should match the film gate or camera aperture (W/H)X2
Image Plane Setup
- After you import your image plane it will need to be sized to your resolution gate. Use the To size option so that the plate gets distorted to fit correctly and add your lens squeeze ratio in here as well. Now everything should match up and look correct in the viewport and in your render output. This works for Maya software render but for other render programs like Mental ray or Vray you will need to set the squeeze correction back to 1 and fit to the film gate.
Overscan
- If you want to setup to render overscan in Maya its quite easy. Import the new image plane, change the render resolution to match the overscan resolution and then increase the camera scale. The amount you increase the camera scale should equal the size you increase the resolution for the overscan in Nuke. In my case I used a reformat set to scale and no resize and the amount was 1.09. This is exactly the value I need to put in the camera scale. Or you can devide each new value with the old one and get the same result. ie. 3593 / 3296 = 1.09


Now everything you render in 3D should match up with the proper pixel aspect giving you rectangular pixels. once you roundtrip back and apply lens distortion on your renders it should produce very good results. I will continue to update this post as I move further along working with anamorphic footage in post or add more workflows for other software packages.

Above the Smoke
https://youtu.be/-rqcbnCQd-I?si=L7_hvEX3fUNAl3cW Dive into a breathtaking cinematic experience that merges nature's raw fury with the marvel of modern technology.

Evening Drift
https://youtu.be/XIJuMUC3xg8?si=_2UJIRiBeLVYV4vJ Spent an amazing evening @MissionRacewayPark filming with the BCDA. I always try to do something different so
Post a Comment
You must be logged in to post a comment.